If you encounter difficulties when adding CSS codes to a Blogger template, here's a convenient and quick alternative method to incorporate CSS (Cascading Style Sheets) that simplifies blog customization.
Some readers have expressed their struggle in locating the ]]></b:skin> tag while attempting to add CSS codes for installing specific features in Blogger. To address this issue, I have created a brief tutorial to present an alternative way of adding CSS without accessing the Blogger HTML editor.
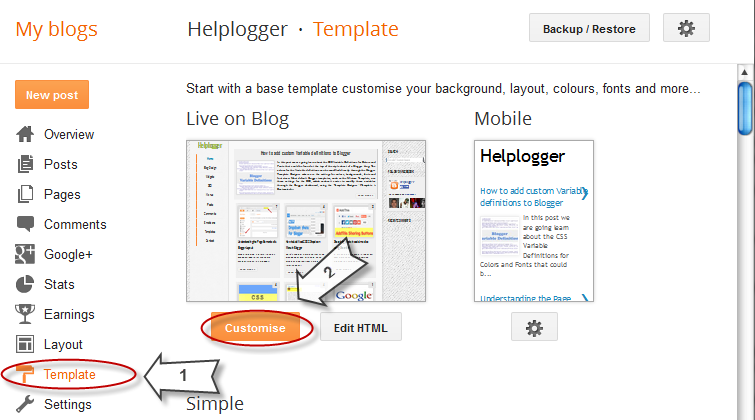
Step 2. From the Blogger dashboard, choose "Template" and click on the "Customize" button.
Step 3. Click on the "Advanced" tab.
Step 4. Inside the "Add CSS" tab, locate the designated field on the right side (you may need to scroll down the options list) and insert your CSS code. Feel free to apply any CSS code to introduce a new style to your template.
Step 5. After making your CSS additions, click the "Apply to blog" button to save the changes.
It is important to note that this method allows you to add new styles and modify existing styles only through the Template Designer panel. Editing the pre-existing CSS styles, which require modifications in the template's HTML, is not possible through this method.
Furthermore, there is no need to include the tags when adding CSS styles. Placing these tags above the tag in the template HTML can result in an error.
Keep in mind that any CSS styles added using this method will be removed if you change the template. The same applies to other customizations or additions made via the Template HTML editor.
Some readers have expressed their struggle in locating the ]]></b:skin> tag while attempting to add CSS codes for installing specific features in Blogger. To address this issue, I have created a brief tutorial to present an alternative way of adding CSS without accessing the Blogger HTML editor.
Adding CSS via the Blogger Template Designer
Step 1. Log in to your Blogger account and select the desired blog for customization.Step 2. From the Blogger dashboard, choose "Template" and click on the "Customize" button.
Step 3. Click on the "Advanced" tab.
Step 4. Inside the "Add CSS" tab, locate the designated field on the right side (you may need to scroll down the options list) and insert your CSS code. Feel free to apply any CSS code to introduce a new style to your template.
Step 5. After making your CSS additions, click the "Apply to blog" button to save the changes.
It is important to note that this method allows you to add new styles and modify existing styles only through the Template Designer panel. Editing the pre-existing CSS styles, which require modifications in the template's HTML, is not possible through this method.
Furthermore, there is no need to include the tags when adding CSS styles. Placing these tags above the tag in the template HTML can result in an error.
Keep in mind that any CSS styles added using this method will be removed if you change the template. The same applies to other customizations or additions made via the Template HTML editor.


Comments
Post a Comment
All types of Comments are welcome